
They say a fleece liner will add 12-15 degrees (F) to your sleeping bag for warmth. I don't really know if that's true, but by God, I hope it is, and I do think my homemade fleece liners work. And it's free - well, almost. You still buy the stuff. But my directions are free, and that counts for something with MYOG Gods. Here is a video of it, and below are my badly written, terribly drawn, instructions.
So here you go. In case you can't read my handwriting, I have transcribed it below. Feel free to screenshot and print, or whatever it is you do. To make a wider blanket, scroll to the bottom. This one is for 29.5 inches wide which will fit most standard sleeping bags. It's important to note, that you can make this even if you don't sew, or dont' have a machine. The variation for this is listed below! :)
NOTE: Huge mistake I made in this graphic: Under tips, I wrote "Wrong sides together". It should be RIGHT sides together - duh. Sorry. I just got mixed up. Anyway, just put the RIGHT sides together so that you are sewing on the "wrong side". That way you can turn it inside out and it will be the right side out. See what I mean, jelly bean?
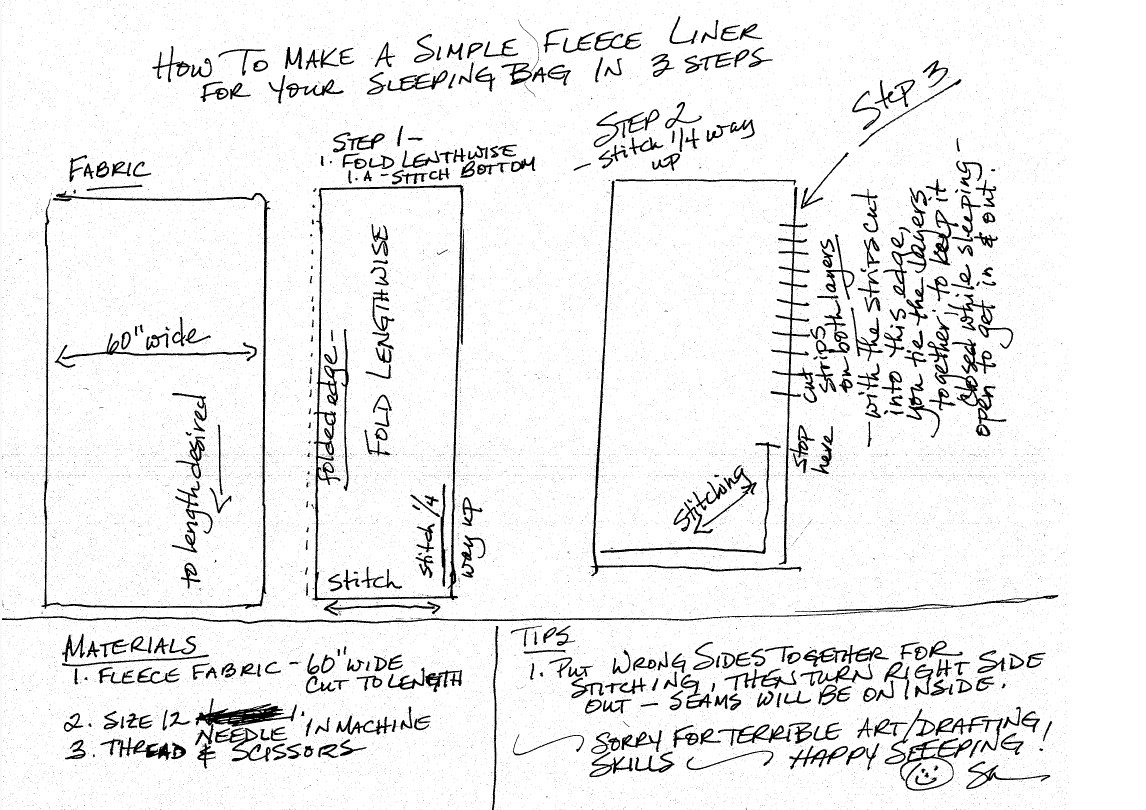
Materials :
1. Fleece fabric - 60" wide, cut to any length you want.
2. Size 12 "Universal" machine needle - any brand.
3. Thread - I like standard polyester but you decide, and scissors
Tip: Machine Settings if you know what I mean. Otherwise, just stitch away and fuh-getaboutit.
Stitch length - 2.5
Stitch type: Straight or Zig Zag - your choice.
Note: Variations:
- You could also just overcast the edges if you prefer using a zig zag stitch or have a serger.
- If you do not have a sewing machine, or simply don't like to sew, you don't have to. Just follow Step 3 on the bottom, around to the side, and then all the way up. No sewing needed!
Step 1:
- Fold the fabric length-wise - tip: with the right sides together so that the wrong side is facing up.
- Stitch the bottom - Tip: I would stitch 1/4 " or less from the edges, using a straight stitch at 2.5 length setting on your machine. This will give you maximum room on the inside of the finished liner and still give you very strong stitched seams.
Step 2:
- Stitch 1/4 of the way up the long side and STOP.
- Turn right side out so that the stitching/seams are on the inside.
Step 3:
- Straighten the liner completely flat and cut into both layers, about 2 " strips the rest of the way up. Stop when you feel like it.
- These strips can be tied together to keep it closed while you are sleeping.
- Open and untied allows you to get in or out of it.
Voila!
Cheap fleece liner and you just saved yourself about 30-50 bucks.
Happy Sleeping!
(And if you think this is silly, here is a picture of a cat in a fleece blanket.)

Okay, so you CAN make a wider blanket. But the problem is, that standard fabric only comes in widths of 40, 58 and 60. I am using a 60" width length of fabric.
Here's what to do, to make your liner larger/wider. Do everything above but you are going to add a step to Step 1. We will call it Step 1.A - v. 2.0 just to make it complicated.
You will need to add a strip to each long edge BEFORE you start anything else. To do this, simply add those strips and stitch all the way down each side. You can do this with any size strip as long as it reaches the total length. So, when you're done, this strip will be sewn to each long edge. THEN continue the steps above. You can make it as wide as 40 inches if you want.
You can also make a simple 60" wide, but layering two 60 " pieces of fabric together. Then sew ALL THE WAY on one side, along the bottom and then 1/4 way up the other side. And then continue with the strips as above.
Allright, so we are done now. Go snuggle with your cat.
Unless you want to see the video and here it is:
No comments:
Post a Comment